Knowledge Base

Knowledge Base

How to create a proposal template in the Saptivo CRM system? #

To simplify the proposal creation process in saptivo CRM, you can create predefined HTML templates that can be used every time a proposal is created.

Create Proposal Template:

To create a proposal template while viewing the contract, follow these steps:

  1. Click on the Templates tab.
  2. Click on ‘Add Template.’
  3. Enter the Template title for easy recognition.
  4. Use the editor to add predefined template content.
  5. Click ‘Save.'”

Insert Template:

Once you have created the template, you will be able to use and insert it into the editor content easily.

While on the Templates tab, for the template you want to insert, click the ‘Insert’ button. The template content will be automatically injected into the proposal editor.

You can send expiration reminders to the lead/customer assigned to this proposal. An email will be sent to the proposal email address added while you created/edited the proposal.

How to set up and manage proposal expiration reminders? #

To configure email expiration reminders navigate to Setup->Settings->CRON job

  1. Set ‘Send expiration reminder’ to YES.
  2. Set the expiration reminder ‘before’ in days. For example, if set to ‘BEFORE 4 DAYS,’ and the proposal open till date is XXX-09-22, the expiration reminder will be sent on XXX-09-18.
  1. You will need a cron job configured for this feature.
  2. Expiration reminders will be sent only for proposals with the status OPEN and SENT.

How do you send a proposal to a customer or lead? #

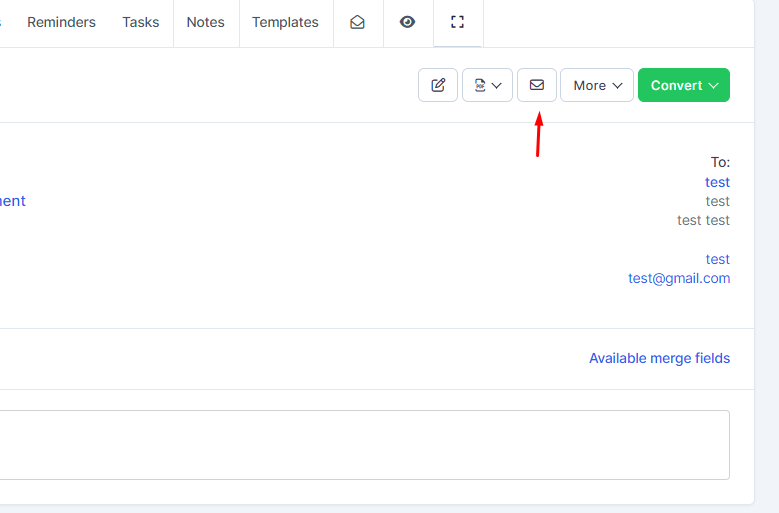
We assume that you have already created the proposal. Click on the mail icon on the right side and a popup with the preview email template will be shown.

You can include the proposal link inside the email template and let your customer view it without logging in. This is also useful for leads.

After you send the proposal, a lead/customer can open it and take actions such as accepting, declining, or making comments. The creator of the proposal and the assigned sales agent will receive notifications in the CRM and via email when the customer comments or accepts/declines the proposal.

How do you convert a proposal to an invoice or estimate in our CRM system? #

How do you convert a proposal to an invoice or estimate in our CRM system? #

  1. Navigate to the table and select the desired proposal.
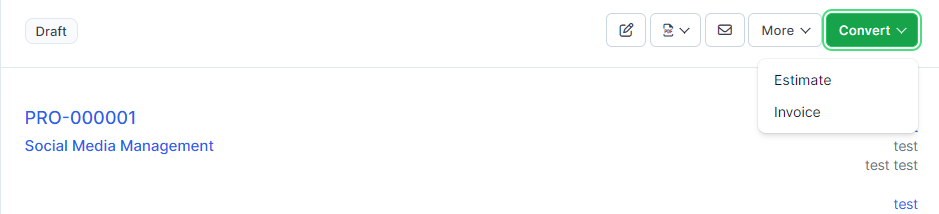
  2. On the right side of the screen, a “Convert” button will appear. Click on this button.
  1. A menu will appear, prompting you to choose between “Estimate” or “Invoice.”
  2. Once you’ve made your selection, a popup will display with a preview of the information. Additionally, parsed items will be automatically inserted into the estimate or invoice.
  3. Review the information in the popup to ensure accuracy. If you’re satisfied with the result, click “Save.”
  4. After the conversion, the proposal will be automatically marked as accepted if it is not already marked as such.
  5. Note: If the proposal is associated with a lead that has not been converted to a client, you must first convert the lead to a client. Afterward, return to the proposal and proceed with the conversion to an estimate or invoice.

How to create a proposal in Saptivo CRM?

From the main menu, navigate to Sales -> Proposals, and on the top left side, click the ‘Create Proposal’ button.

You can create a proposal for a lead or a customer.

  1. Choose ‘Related to Lead’ or ‘Customer.’
  2. Select the lead or customer it is related to. On the right side, the found information will be auto-filled, and you can adjust it according to your needs.
  3. Status – By default, the draft status will be auto-selected. Note that proposals with draft status are not visible to customers. The ‘Open’ status means that it is open for the customer to take actions, e.g., accept or decline the proposal.
  4. Open Till – The date when the proposal will stay open, and the user can take actions (Accept/Decline). Go to Setup -> Settings -> Finance -> Proposal to set ‘Proposal due after’ to auto-populate this field.
  5. Currency – When creating a proposal for a lead, you can add any currency you need. Otherwise, if you are creating a proposal for a customer, the system-based currency will be used, or the customer’s currency.
  6. Allow Comments – If this field is unchecked, the user won’t be able to comment on the proposal (e.g., negotiate with price, etc.).

Save the proposal to add proposal content.

Add Proposal Content:

You can add proposal content directly from the admin area while previewing the proposal.

After saving/creating the proposal, you will be redirected to the preview area where you can add content.

By default, the proposal content will include only a merge field {proposal_items}. This merge field will display the proposal items, for example, in PDF format or when a customer is viewing the proposal in the HTML area.

If you wish to include additional content, simply click in the editor and start typing.

The proposal content is automatically saved, eliminating the need for manual saving. If necessary, you can utilize the shortcut CTRL+S.

Merge Fields:

To avoid duplicating content, you can utilize the merge fields feature by clicking on the ‘Available Merge Fields’ link. When you need to create a new proposal with similar content, you can simply copy an existing one.

“Copy Proposal:

To duplicate the proposal, click on ‘More’ and then select ‘Copy.

How to create a proposal template in the Saptivo CRM system? #

To simplify the proposal creation process in saptivo CRM, you can create predefined HTML templates that can be used every time a proposal is created.

Create Proposal Template:

To create a proposal template while viewing the contract, follow these steps:

  1. Click on the Templates tab.
  2. Click on ‘Add Template.’
  3. Enter the Template title for easy recognition.
  4. Use the editor to add predefined template content.
  5. Click ‘Save.'”

Insert Template:

Once you have created the template, you will be able to use and insert it into the editor content easily.

While on the Templates tab, for the template you want to insert, click the ‘Insert’ button. The template content will be automatically injected into the proposal editor.

You can send expiration reminders to the lead/customer assigned to this proposal. An email will be sent to the proposal email address added while you created/edited the proposal.

How to set up and manage proposal expiration reminders? #

To configure email expiration reminders navigate to Setup->Settings->CRON job

  1. Set ‘Send expiration reminder’ to YES.
  2. Set the expiration reminder ‘before’ in days. For example, if set to ‘BEFORE 4 DAYS,’ and the proposal open till date is XXX-09-22, the expiration reminder will be sent on XXX-09-18.
  1. You will need a cron job configured for this feature.
  2. Expiration reminders will be sent only for proposals with the status OPEN and SENT.

How do you send a proposal to a customer or lead? #

We assume that you have already created the proposal. Click on the mail icon on the right side and a popup with the preview email template will be shown.

You can include the proposal link inside the email template and let your customer view it without logging in. This is also useful for leads.

After you send the proposal, a lead/customer can open it and take actions such as accepting, declining, or making comments. The creator of the proposal and the assigned sales agent will receive notifications in the CRM and via email when the customer comments or accepts/declines the proposal.

How do you convert a proposal to an invoice or estimate in our CRM system? #

How do you convert a proposal to an invoice or estimate in our CRM system? #

  1. Navigate to the table and select the desired proposal.
  2. On the right side of the screen, a “Convert” button will appear. Click on this button.
  1. A menu will appear, prompting you to choose between “Estimate” or “Invoice.”
  2. Once you’ve made your selection, a popup will display with a preview of the information. Additionally, parsed items will be automatically inserted into the estimate or invoice.
  3. Review the information in the popup to ensure accuracy. If you’re satisfied with the result, click “Save.”
  4. After the conversion, the proposal will be automatically marked as accepted if it is not already marked as such.
  5. Note: If the proposal is associated with a lead that has not been converted to a client, you must first convert the lead to a client. Afterward, return to the proposal and proceed with the conversion to an estimate or invoice.

How to create a proposal in Saptivo CRM?

From the main menu, navigate to Sales -> Proposals, and on the top left side, click the ‘Create Proposal’ button.

You can create a proposal for a lead or a customer.

  1. Choose ‘Related to Lead’ or ‘Customer.’
  2. Select the lead or customer it is related to. On the right side, the found information will be auto-filled, and you can adjust it according to your needs.
  3. Status – By default, the draft status will be auto-selected. Note that proposals with draft status are not visible to customers. The ‘Open’ status means that it is open for the customer to take actions, e.g., accept or decline the proposal.
  4. Open Till – The date when the proposal will stay open, and the user can take actions (Accept/Decline). Go to Setup -> Settings -> Finance -> Proposal to set ‘Proposal due after’ to auto-populate this field.
  5. Currency – When creating a proposal for a lead, you can add any currency you need. Otherwise, if you are creating a proposal for a customer, the system-based currency will be used, or the customer’s currency.
  6. Allow Comments – If this field is unchecked, the user won’t be able to comment on the proposal (e.g., negotiate with price, etc.).

Save the proposal to add proposal content.

Add Proposal Content:

You can add proposal content directly from the admin area while previewing the proposal.

After saving/creating the proposal, you will be redirected to the preview area where you can add content.

By default, the proposal content will include only a merge field {proposal_items}. This merge field will display the proposal items, for example, in PDF format or when a customer is viewing the proposal in the HTML area.

If you wish to include additional content, simply click in the editor and start typing.

The proposal content is automatically saved, eliminating the need for manual saving. If necessary, you can utilize the shortcut CTRL+S.

Merge Fields:

To avoid duplicating content, you can utilize the merge fields feature by clicking on the ‘Available Merge Fields’ link. When you need to create a new proposal with similar content, you can simply copy an existing one.

“Copy Proposal:

To duplicate the proposal, click on ‘More’ and then select ‘Copy.

Table of contents

  1. How do I send a proposal with a viewable link for customers?
  2. How do I create a new customer contact in our CRM system?
  3. How do I create a new customer in the CRM system dashboard?
  4. How to restrict a staff member’s access to view all customers in the Saptivo CRM system?
  5. How can you register a customer in our CRM system?
  6. How can I generate a general customer report in the Saptivo CRM system? 
  7. How can you export data from a customer’s profile in our CRM system?

How do I merge invoices in the Saptivo CRM system?

Merging invoices is a feature in Saptivo CRM that allows you to combine/include already created invoices into one invoice by transferring all the invoice information to a new invoice. This feature is useful when your customer has other unpaid invoices, but you need to create an additional invoice for the customer, and you want to prevent them from paying multiple invoices. In this case, your customer will only need to pay one consolidated invoice.

To check if there are available invoices to be merged, you can find this information in different places:

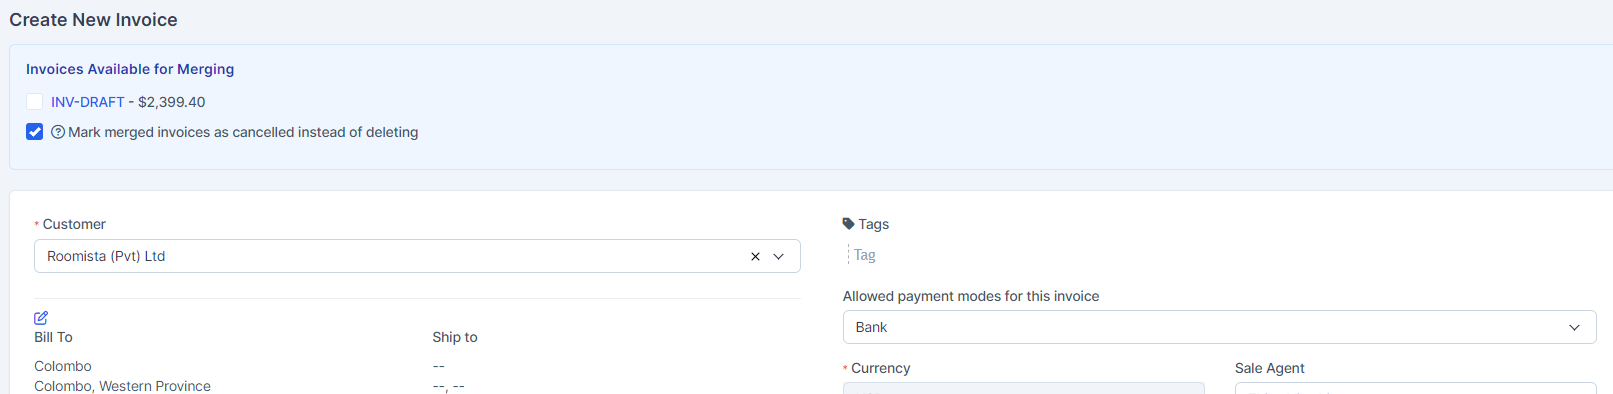
  • 1. When creating a new invoice: Available invoices to merge are displayed after selecting a customer. The system will check if there are invoices that can be merged into the one you are creating for the selected customer.
  • 2. When previewing an existing invoice from the admin area: Available invoices will be shown at the top, and you can click on the edit button to take the necessary action.
  • 3. When editing an existing invoice: Available invoices for merging are displayed immediately after entering the edit invoice area.

It’s important to note that you can only merge invoices with the following statuses: Unpaid, Overdue, and Draft. For example, if the invoice you are editing has a status of Partially Paid, you won’t be able to merge existing invoices into it unless they also have a status of Unpaid, Overdue, or Draft.

To merge invoices, when you create or edit an invoice, a message will appear at the top indicating if there are invoices available for merging


You can merge multiple invoices by selecting the checkbox on the left side of the invoice number.

Once the checkbox is selected, the invoice items will be automatically added to your existing invoice that you are currently creating or editing.

Click ‘Save.’While editing/creating the invoice, the adjustment option is always available if you want to +/- the total amount.

Please note that if the payment is recorded via the admin area by a staff member (currently logged in), this staff member won’t receive an email.

  • 1. Navigate to Setup -> Settings -> Cron Job -> Invoices.
  • 2. Set up automatic overdue notices by adjusting the field ‘Automatically send a 3 reminder after.’ If you want to send the notice the same day the invoice is overdue, set it to 0; otherwise, adjust it according to your preferences.
  • 3. The second field pertains to resending overdue notices based on the last notice date. To disable resending, set this field to 0.

Cancelled invoices are excluded from reports, and overdue reminders are disabled.

How can you configure automatic invoice overdue notices in our CRM system? 

You can send invoice overdue notices either manually or automatically using a cron job.

For automatic overdue notices:

  • 1. Navigate to Setup -> Settings -> Cron Job -> Invoices.
  • 2. Set up automatic overdue notices by adjusting the field ‘Automatically send a 3 reminder after.’ If you want to send the notice the same day the invoice is overdue, set it to 0; otherwise, adjust it according to your preferences.
  • 3. The second field pertains to resending overdue notices based on the last notice date. To disable resending, set this field to 0.

Cancelled invoices are excluded from reports, and overdue reminders are disabled.

  • Set the expiration reminder ‘before’ in days. For example, if set to ‘BEFORE 4 DAYS,’ and the proposal open till date is XXX-09-22, the expiration reminder will be sent on XXX-09-18.
    1. You will need a cron job configured for this feature.
    2. Expiration reminders will be sent only for proposals with the status OPEN and SENT.

    How do you send a proposal to a customer or lead?

    We assume that you have already created the proposal. Click on the mail icon on the right side and a popup with the preview email template will be shown.

    You can include the proposal link inside the email template and let your customer view it without logging in. This is also useful for leads.

    After you send the proposal, a lead/customer can open it and take actions such as accepting, declining, or making comments. The creator of the proposal and the assigned sales agent will receive notifications in the CRM and via email when the customer comments or accepts/declines the proposal.

    How do you convert a proposal to an invoice or estimate in our CRM system?

    1. Navigate to the table and select the desired proposal.
    2. On the right side of the screen, a “Convert” button will appear. Click on this button.

    1. A menu will appear, prompting you to choose between “Estimate” or “Invoice.”
    2. Once you’ve made your selection, a popup will display with a preview of the information. Additionally, parsed items will be automatically inserted into the estimate or invoice.
    3. Review the information in the popup to ensure accuracy. If you’re satisfied with the result, click “Save.”
    4. After the conversion, the proposal will be automatically marked as accepted if it is not already marked as such.
    5. Note: If the proposal is associated with a lead that has not been converted to a client, you must first convert the lead to a client. Afterward, return to the proposal and proceed with the conversion to an estimate or invoice.

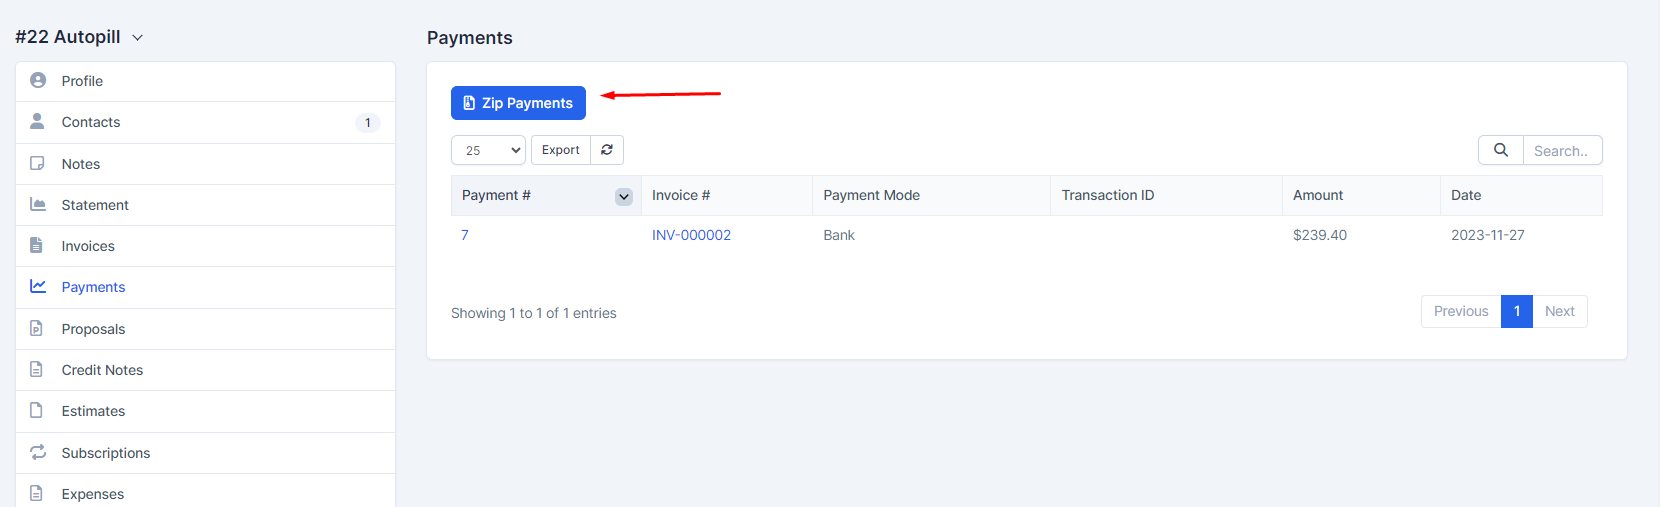
    How do you export customer invoices, estimates, and payments to a ZIP file in CRM?

    Go to the customer profile and click on the tab where you want to export data, e.g., invoices.

    Select a status or just leave it as ‘All’ and click ‘Submit.’ All invoices based on your selected options will be added to a .zip file.

    You can choose a start and end date, the date is based on the invoice/estimate/payment date.

    How to create a proposal template in the Saptivo CRM system?

    To simplify the proposal creation process in saptivo CRM, you can create predefined HTML templates that can be used every time a proposal is created.

    Create Proposal Template:

    To create a proposal template while viewing the contract, follow these steps:

    1. Click on the Templates tab.
    2. Click on ‘Add Template.’
    3. Enter the Template title for easy recognition.
    4. Use the editor to add predefined template content.
    5. Click ‘Save.'”

    Insert Template:

    Once you have created the template, you will be able to use and insert it into the editor content easily.

    While on the Templates tab, for the template you want to insert, click the ‘Insert’ button. The template content will be automatically injected into the proposal editor.

    You can send expiration reminders to the lead/customer assigned to this proposal. An email will be sent to the proposal email address added while you created/edited the proposal.

    How to create a proposal template in the Saptivo CRM system?

    To simplify the proposal creation process in saptivo CRM, you can create predefined HTML templates that can be used every time a proposal is created.

    Create Proposal Template:

    To create a proposal template while viewing the contract, follow these steps:

    1. Click on the Templates tab.
    2. Click on ‘Add Template.’
    3. Enter the Template title for easy recognition.
    4. Use the editor to add predefined template content.
    5. Click ‘Save.'”

    Insert Template:

    Once you have created the template, you will be able to use and insert it into the editor content easily.

    While on the Templates tab, for the template you want to insert, click the ‘Insert’ button. The template content will be automatically injected into the proposal editor.

    You can send expiration reminders to the lead/customer assigned to this proposal. An email will be sent to the proposal email address added while you created/edited the proposal.

    How do you send a proposal to a customer or lead?

    We assume that you have already created the proposal. Click on the mail icon on the right side and a popup with the preview email template will be shown.

    You can include the proposal link inside the email template and let your customer view it without logging in. This is also useful for leads.

    After you send the proposal, a lead/customer can open it and take actions such as accepting, declining, or making comments. The creator of the proposal and the assigned sales agent will receive notifications in the CRM and via email when the customer comments or accepts/declines the proposal.

    How do you convert a proposal to an invoice or estimate in our CRM system?

    How do you convert a proposal to an invoice or estimate in our CRM system?

    How do you export customer invoices, estimates, and payments to a ZIP file in CRM?

    Go to the customer profile and click on the tab where you want to export data, e.g., invoices.

    Select a status or just leave it as ‘All’ and click ‘Submit.’ All invoices based on your selected options will be added to a .zip file.

    You can choose a start and end date, the date is based on the invoice/estimate/payment date.